Meta Ads popularly, known as Facebook Ads, are a must do for any business in Kenya. It’s one of the easiest ways you can get customers to buy your goods or services.
However, many people do not know how to set them up. Overtime I have learnt that any slight mistake in your ad structure can have severe consequences on the results you get. But as for you, this will be a thing of the past as you have come to the right place.
I have been running Meta ads for over 7 years now. Therefore, the advise and steps I shall outline in this article are as a result of my own personal experiences and years of testing different strategies until I found a strategy that actually works.
Are you excited? I hope you are because I certainly am, and I can’t wait to share with you all the knowledge I have and to later hear from you on how you’ve been crushing it in your business after implementing my strategies.
Some more good news is that over and above the nuggets given here you can book a one-on-one mentorship call with me and I can guide you further on anything meta ads. But before all that let’s dive head first and learn how to create a winning Facebook/Instagram ad in Kenya.

Need help with your ads?
With 7 years of experience and over Ksh 1 Million spent in Meta ads, I’ve mastered what truly works for the Kenyan market. Let me help you achieve real, measurable results with strategies that drive success.
How to Get Started With Creating a Winning Meta Ad
For better input and experience when setting up meta ads, I recommend using either a laptop or a desktop computer.
To get started, w’ll need to navigate to the Ads manager. To get to the Ads manager simply login to your Facebook page on the left side click on Ads Manager.
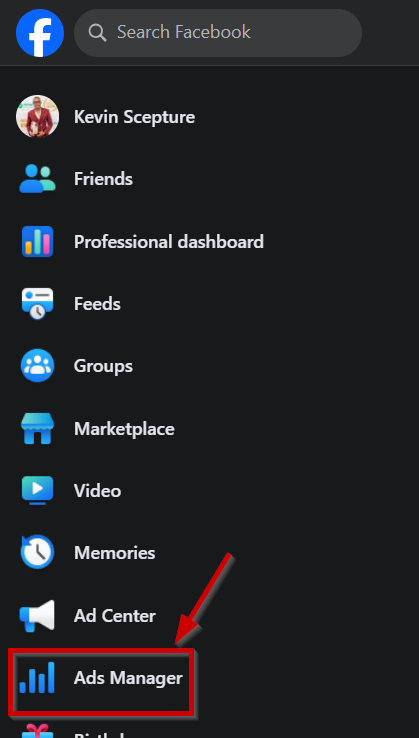
You will be redirected to the Ads manager section and it should look like the image below.
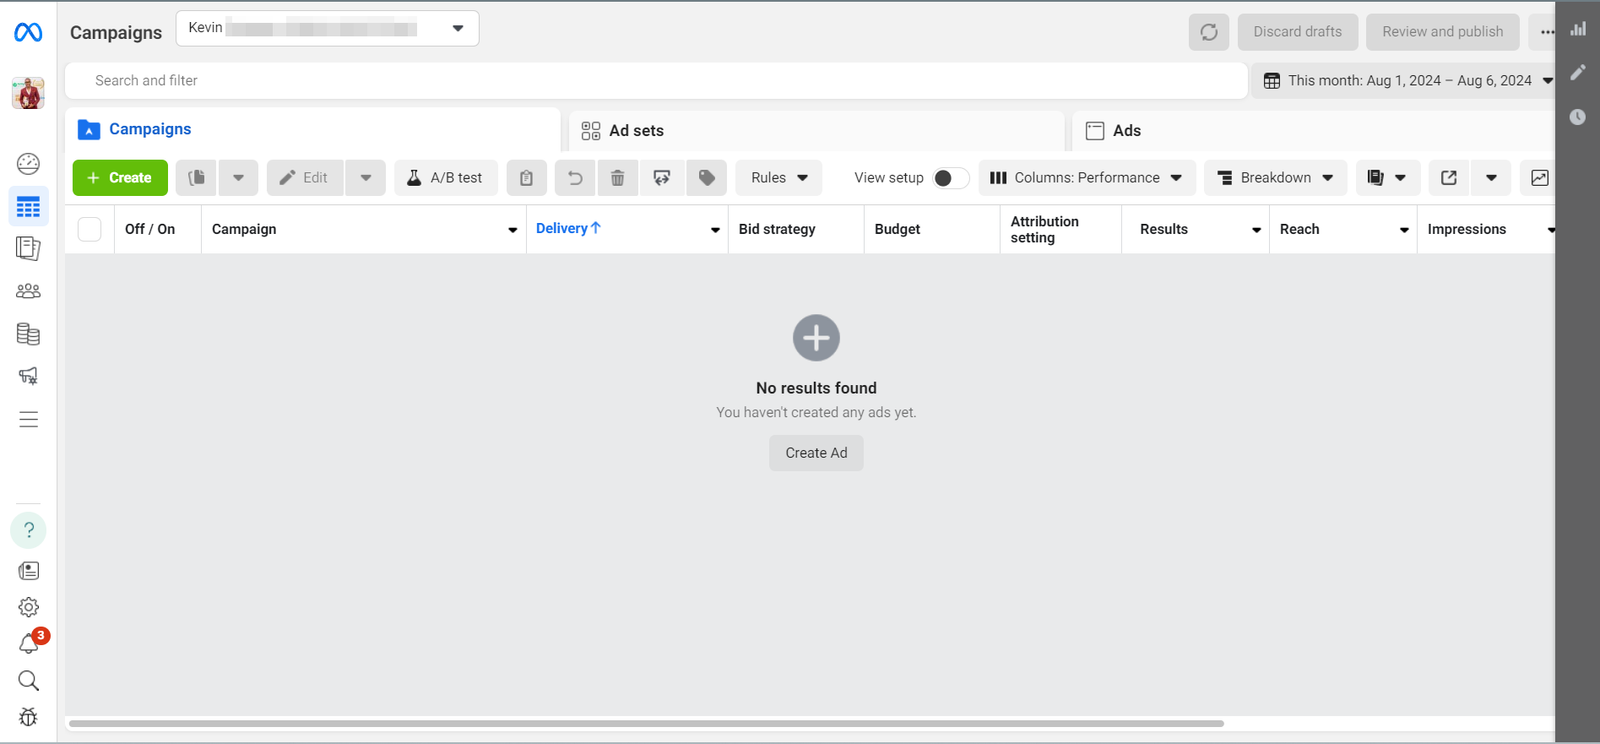
There are 3 levels on the Ads manager as can be seen on the top.
- The Campaigns level: On this level you choose the objective for your ad. Facebook has different types of objectives as we shall soon see.
- The Ad Sets level: On this level we choose our audience, where the audience will go once they click our ad as well as the ad placement.
- The Ads level: Here is where we design the actual ad that people will see on Facebook/Instagram or partner networks.
I know that’s a lot of information to take in already but don’t worry it will make sense as we proceed.
The Campaigns Level
Click the green create button to get started, this will take us to the campaigns level.
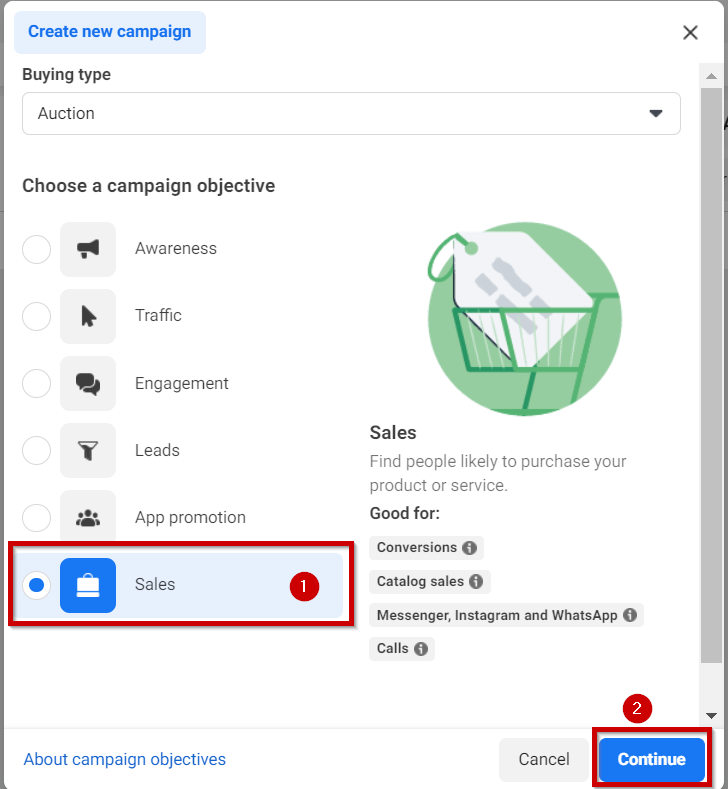
As I had mentioned earlier Facebook has got a lot of objectives that you can optimize for. In simple language Facebooks’ algorithm is so advanced that it will do exactly what you tell it to do. Therefore, if you need traffic to your page the algorithm will drive traffic to your page, if you need engagement (likes and comments) the algorithm will do just that.
Therefore, you should always be conscience and clear what objective you want to achieve with your ad. In our case we want sales, that being the case we shall choose the sales objective. Click the continue button to proceed.
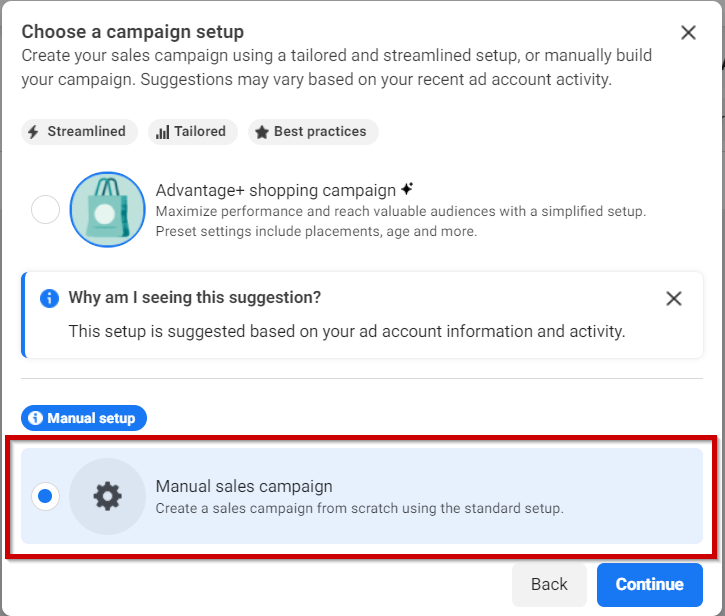
On the next window you shall be provided with 2 options, the Advantage+ shopping campaign and the Manual Sales campaign.
The Advantage+ shopping campaign has some steps already done for you. The danger with this is that based on how you setup your ads some of these done-for-you steps might not be good. Remember what I said in the beginning a slight mistake in your ad structure can have severe consequences on your results.
In this regard, we shall select the Manual sales campaign so that we can select all the options we want and leave out the once we don’t want. Click continue.
On the new window under “campaign name” you can rename the campaign so that you can differentiate it from future campaigns.
Leave everything else as is and scroll down to “Advantage+ catalog ads” by default that should be off but incase it’s on toggle it off.
Proceed to the “Advantage campaign budget” section.

Lemme explain something here before we procced. On this section you can leave it off or you can turn it on.
If you’re only going to run just one Ad then leave this section off but if you are going to run several ads under the same campaign toggle on this section. When it’s toggled on it means meta will distribute your budget to all ads at their own discretion based on how those ads are performing.
In this example we shall toggle it on as we shall create a number of ads under this campaign.
The next step is to choose a budget. The minimum amount you can spend is a dollar. However, for better results I’d recommend Ksh 500 daily, you can up this later when the ad is performing well and you want to get more results.
Leave everything else as is, scroll down and hit next to go to the Ads set level.
Ad Sets Level
Under “Ad set name” rename the ad set for future reference. Once done proceed to Conversion location.
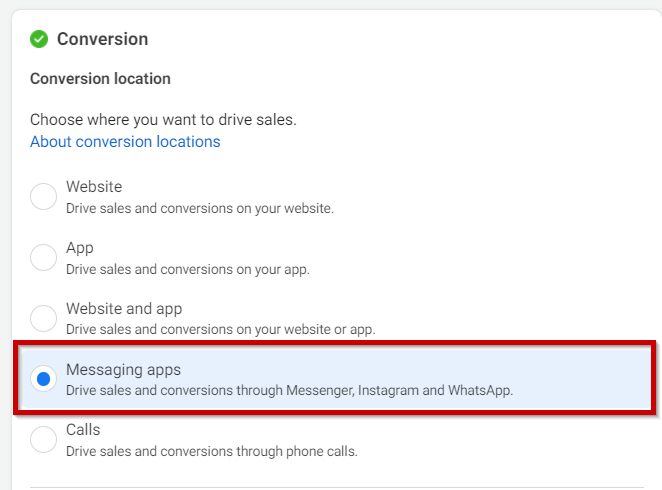
Conversion location simply means where your customers will land once they click on your ad. You can lead customers to a website, App, WhatsApp, Messenger, Instagram DM or even to calls.
Having tried all options. For a Kenyan business I’d recommend WhatsApp as a conversion location. Why You ask? Let me explain!
I find most customers want to talk to someone before they can place an order and WhatsApp is a good place for this kind of conversations to happen.
Secondly, when the customer remains on meta channels the algorithm is able to track their behavior all through and this information is used to better optimize your ad.
Thirdly, and what has become the most important thing for me is that you can have a customized WhatsApp chatbot that can answer all questions your clients ask and process orders all on automation, how cool is that!
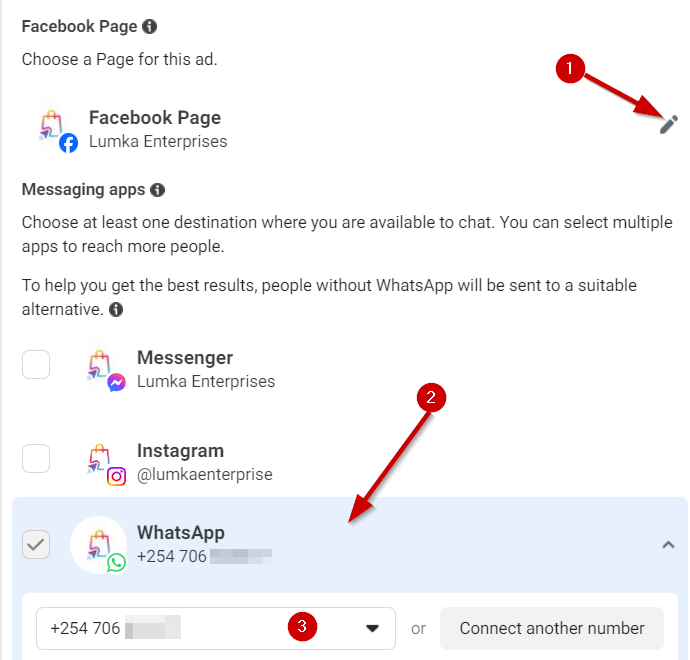
Proceed by selecting the Facebook page where your ad(s) will run then select WhatsApp as the conversion location and enter the Business WhatsApp number.
Scroll down to the Performance goal option. On the drop down menu select Maximize number of conversations.
Leave everything else as is and go to the “Audience controls” section.
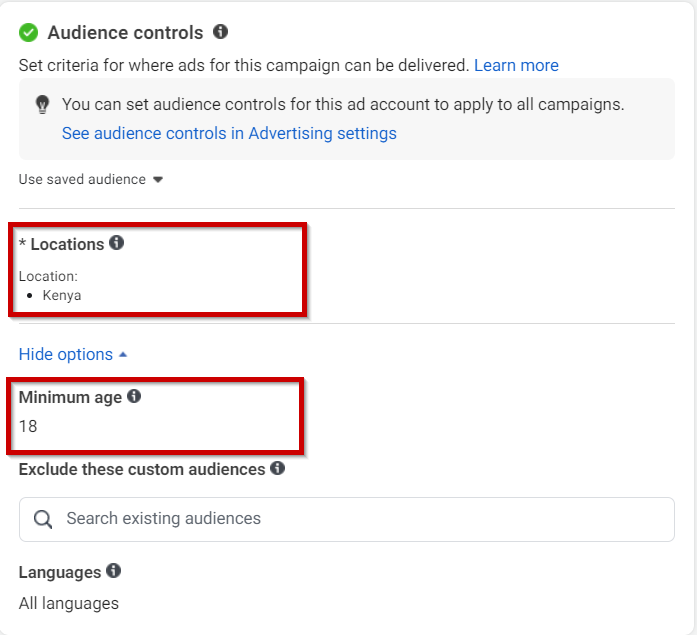
Here ensure the location is set to Kenya, Select the minimum age of the people who buy your products or services. Once done proceed to the “Advantage+ audience”.
The Meta algorithm is so advanced that it can be able to find customers who will buy your products or services as they have mentioned below. However, it doesn’t hurt to direct the algorithm in the right direction and tell it where to start looking. What do I mean by that?
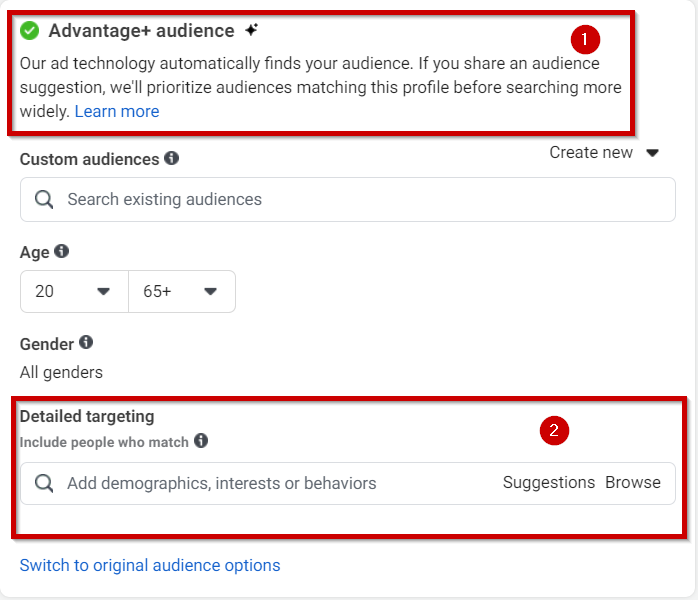
In this section you can leave the audience as broad and leave the algorithm to work out who is the ideal customer for your goods or services but this can take a while and while this is happening the system is using your money. Therefore, the ideal thing to do here is to suggest a few options of who your ideal customer is so that straight of the bat the system knows where to start looking.
So head down to the Detailed targeting section and start typing in a few suggestions of who your customers are. For example if you sell school uniforms you can target parents, teachers, schools, married people, parents with early school age children, people who have expressed an interest in or like pages related to Secondary education (primary & secondary education) etc.
You can click on the suggestions tab and the system will suggest a few more options based on your initial entries. The trick here though is do not over populate the audience an audience of around 2 million people is okay.
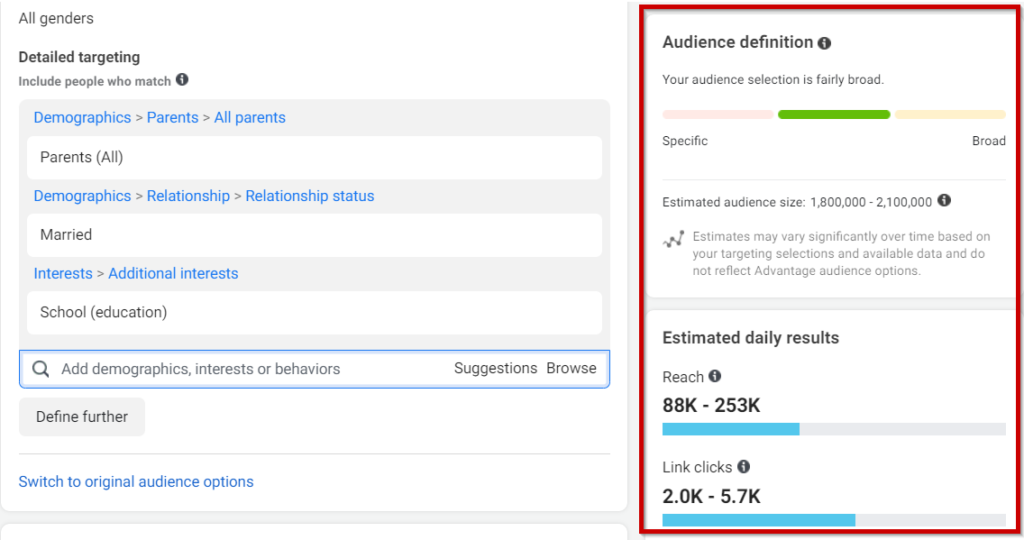
Keep an eye on the right side to see your estimated audience size once you get to 2 million people that’s okay, the algorithm will now work it’s magic from there.
Once you’re done leave everything else as is and click the next button to proceed to the Ad level.
The Ads Level
Here is where we get to structure the actual ad(s) that people will see on Facebook or Instagram.
Under the “ad name” give the ad a name so that you can differentiate each ad. Scroll down to the “Identity” section and make sure the correct pages are selected.
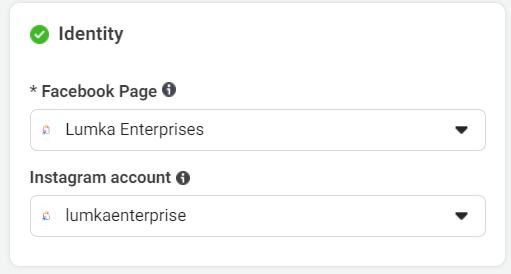
Proceed to the “ad setup” section.
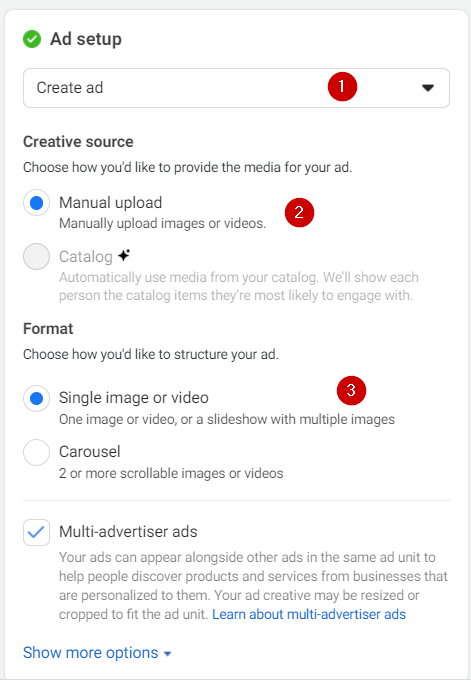
Select create ad then manually upload as we shall upload an image or a video. Under format click on the single image or video section. Leave the multi-advertiser radio box checked.
Proceed to the Ad creative section.

This is the single most section where you should pay a lot of attention as what you do here is exactly what people will see on Facebook or Instagram.
Start by adding an image or video of the product or service you want to advertise.
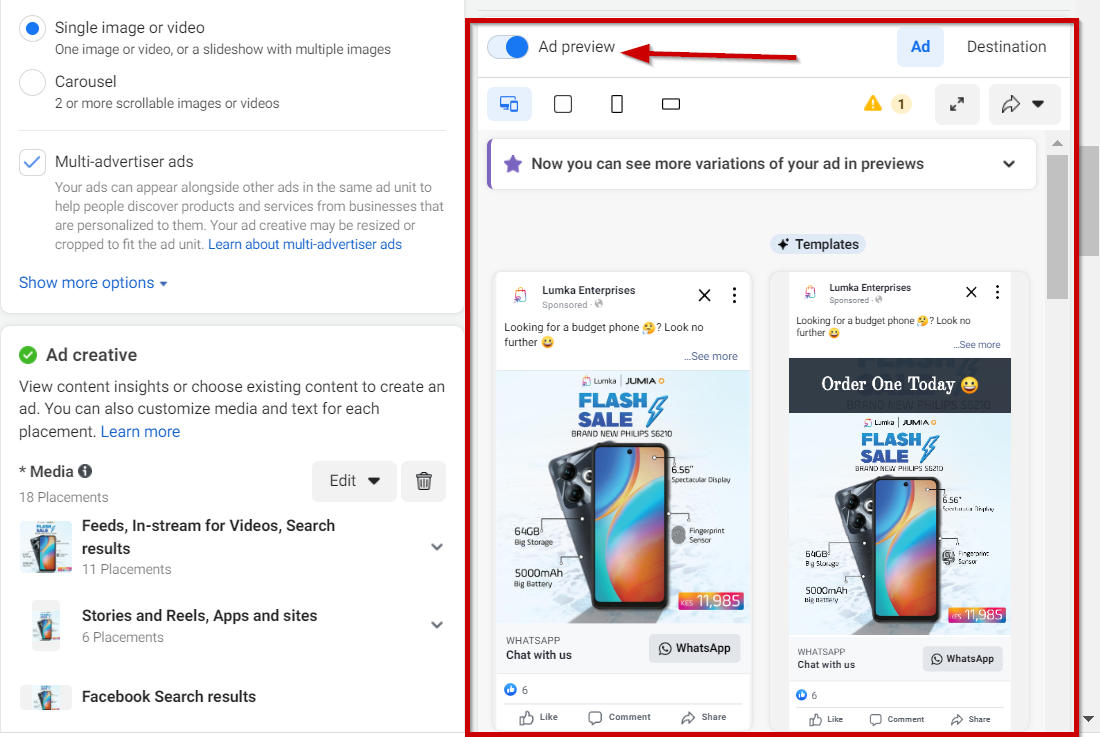
On the right side turn on the “ad preview” and you can see a live preview of your ad as you edit it.
Proceed to number 2 and add a primary text/ad copy. This is the text part of the Ad.

When adding a primary text try and be as brief as possible while still communicating your message clearly. Bonus point, use emojis in your text to make it visually appealing.
You can use the default headline “Chat with Us” as it tells the customer they should chat with you on WhatsApp for further details.
The final option ensure “Send WhatsApp message” is set as the call to action. Then proceed to the “Message template” section.
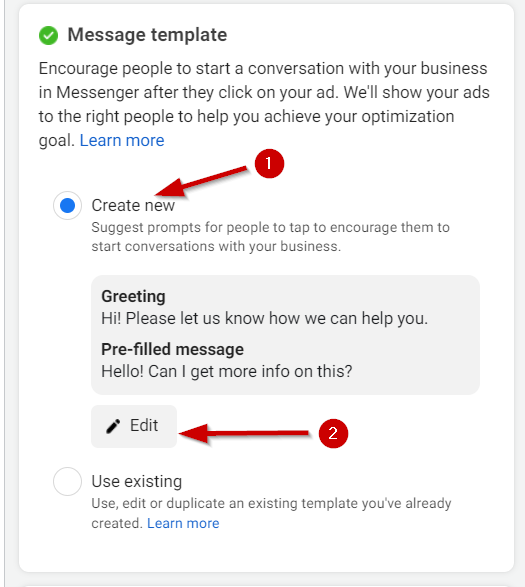
Click on create new and edit.

Here you can setup a few frequently asked questions that you normally receive about your product or services. Once the customer clicks on your ads they will be presented with these questions and they just click on one and send to your WhatsApp.
Once done you can then head over to your WhatsApp business account and setup quick replies to these questions.
Proceed to check on the placements just to make sure each ad looks good in each placements.
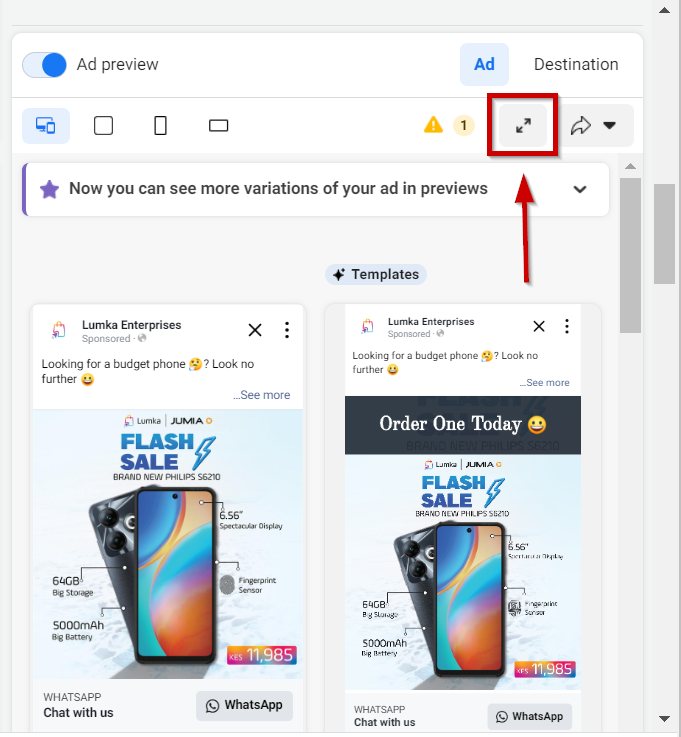
Under the ad preview click on the shown icon to expand your view of the placements.
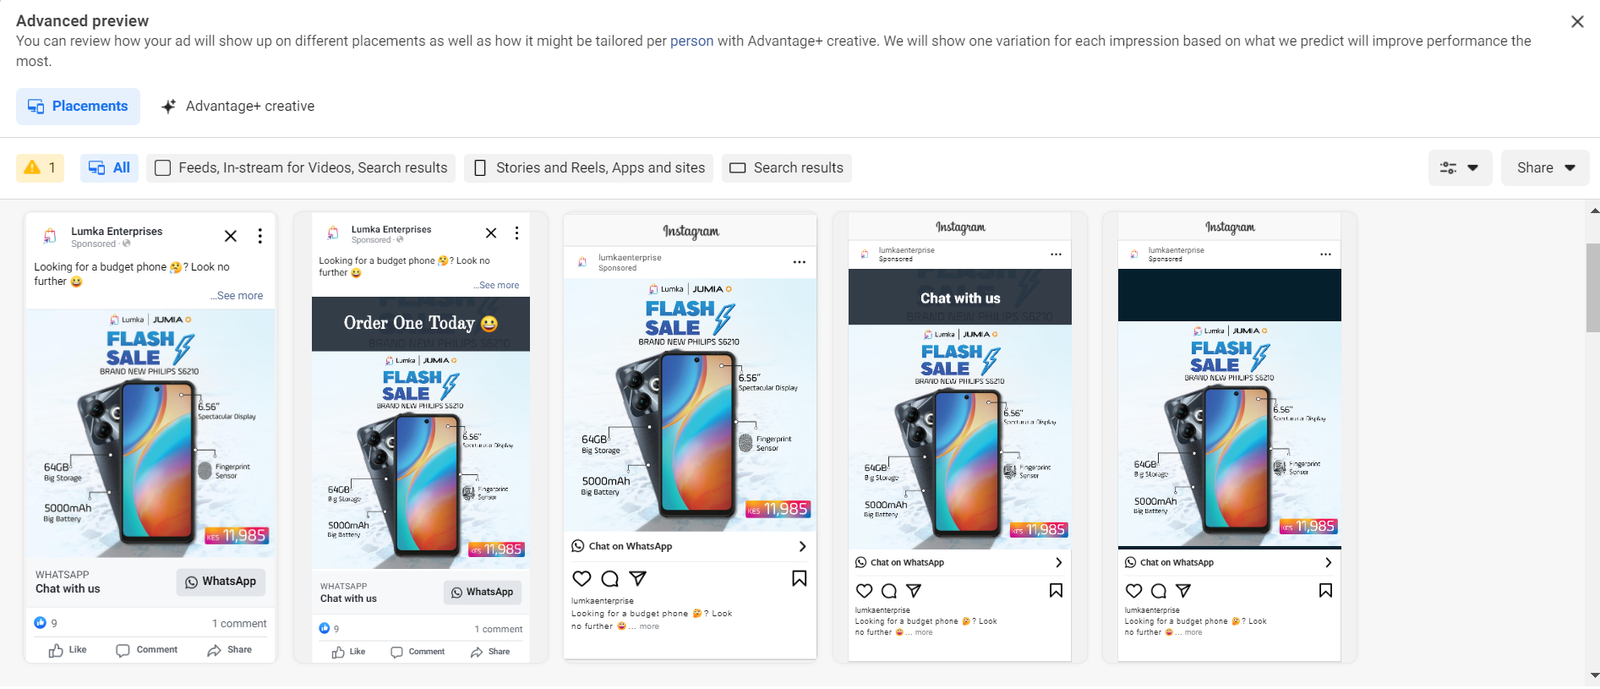
Scroll down and ensure your ad sits well on all placements.
That marks the end of our ad structure if you’re just creating one ad. You can double check everything and make sure all options are set okay and hit Publish to take your ad live.
However, as I had mentioned earlier we shall have a few more ads under the same campaign. This is advisable as it means your audience will be shown different ads about your products or services. They might end up resonating with one than the other.
Secondly, you might find out after a while one ad preforms better than the others and in that case we switch off non-performing ads and scale the winners.
To achieve this click the 3 dots after the ad name and click duplicate.
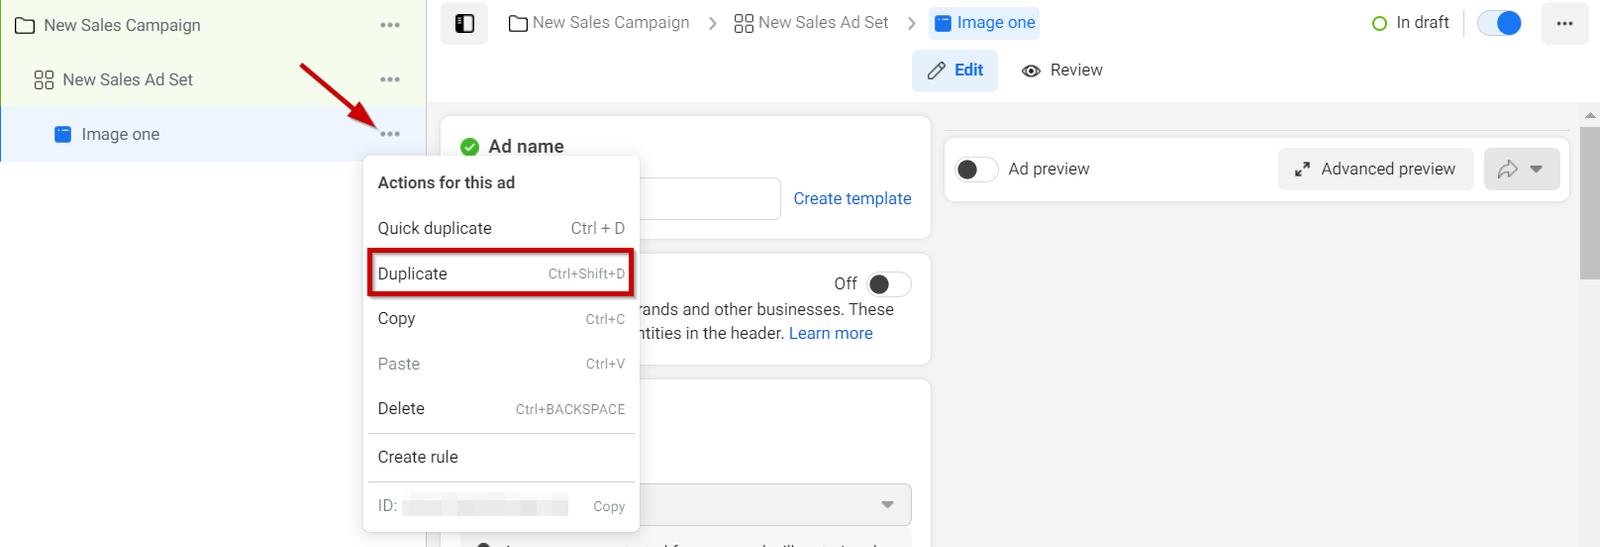
On the next tab leave everything as is and click duplicate.
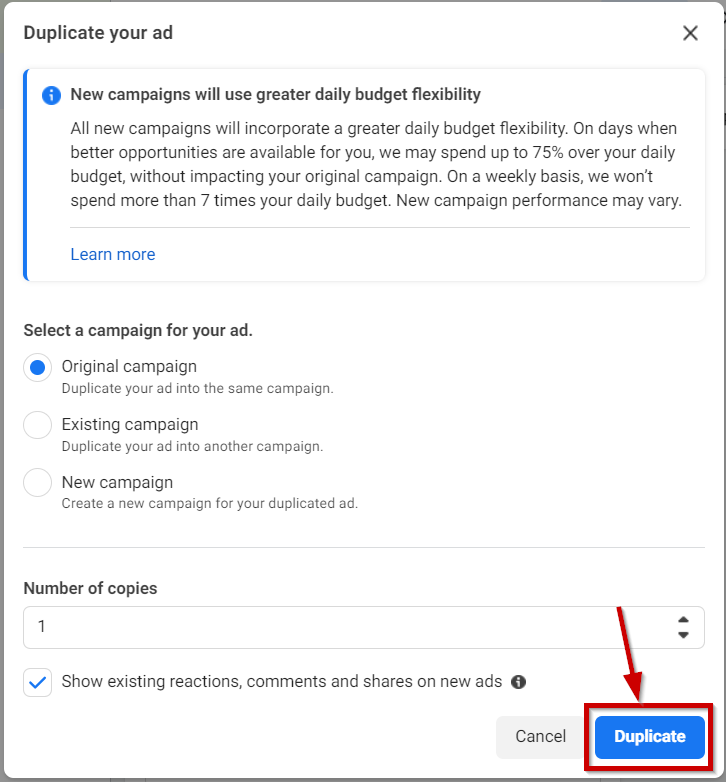
In so doing you will have an exact replica of the initial ad that you had created. You can add another image or a video, use different primary text and a different headline.
Kindly note! leave the message template as is.
You can duplicate the ad a number of times to add more images or videos. However, do not duplicate more than 4 times. It’s advisable to have a maximum of 5 ads under one campaign.
Once everything is done click the green Publish button. Your ad will go into review and shall be approved or rejected in a few minutes or hours.
Once your ad is approved you should expect to see WhatsApp messages of interested customers enquiring about your products or services.
Conclusion
Structuring an ad is only 80% of the sales process. The other 20% is how you handle customers once they start enquiring about your services. Try and respond fast to customers who reach out to you.
Imagine going to a shop and you found no attendant you would probably leave in 5 minutes of not being served right? The same applies to online sales, if you leave your customers queries unanswered for long they will go to the next available option and trust me the options are there because guess what! remember how I mentioned that the algorithm will work out who your ideal client is?
It will notice a client paid attention to your ad and it will show them related ads and therefore if they happen to go to your competitor and they respond fast then that’s a lost sale for you.
That’s all my friends incase you need any further assistance in regards to meta ads you can book a one on one consultation call with me here.
If this article was of help to you leave us a comment below and we shall be delighted to hear from you.

Kevin brings a wealth of experience to the Biz Sasa platform thanks to his background in eCommerce & marketing. He has a degree in Commerce and is a CPA (Finalist). He’s founded Scepture Empire Ltd, a company dealing in vehicle security devices.
