So, you have just finally decided to take the plunge! Congratulations on officially dipping your feet into the world of entrepreneurship. However, for your business to gain an identity of its own, you will need to complete the basic step of having its name registered. Luckily, this is a relatively straightforward process provided you follow the right steps.
In the following few paragraphs, we will delve into the specific steps to take when you need to have your business name formally registered in Kenya.
How to Register a Business Name in Kenya
For this task you will require the following:
- A registered eCitizen Account
- At least 3 proposed business names
- Passport photo
- Computer or phone
- Internet connection
And now without further ado, let’s see how to get this done.
Enjoy Our “Do-It-For-You” Business Name Registration Service
In a rush? Enjoy our do-it-for-you Business Name Registration service. Fast and secure.
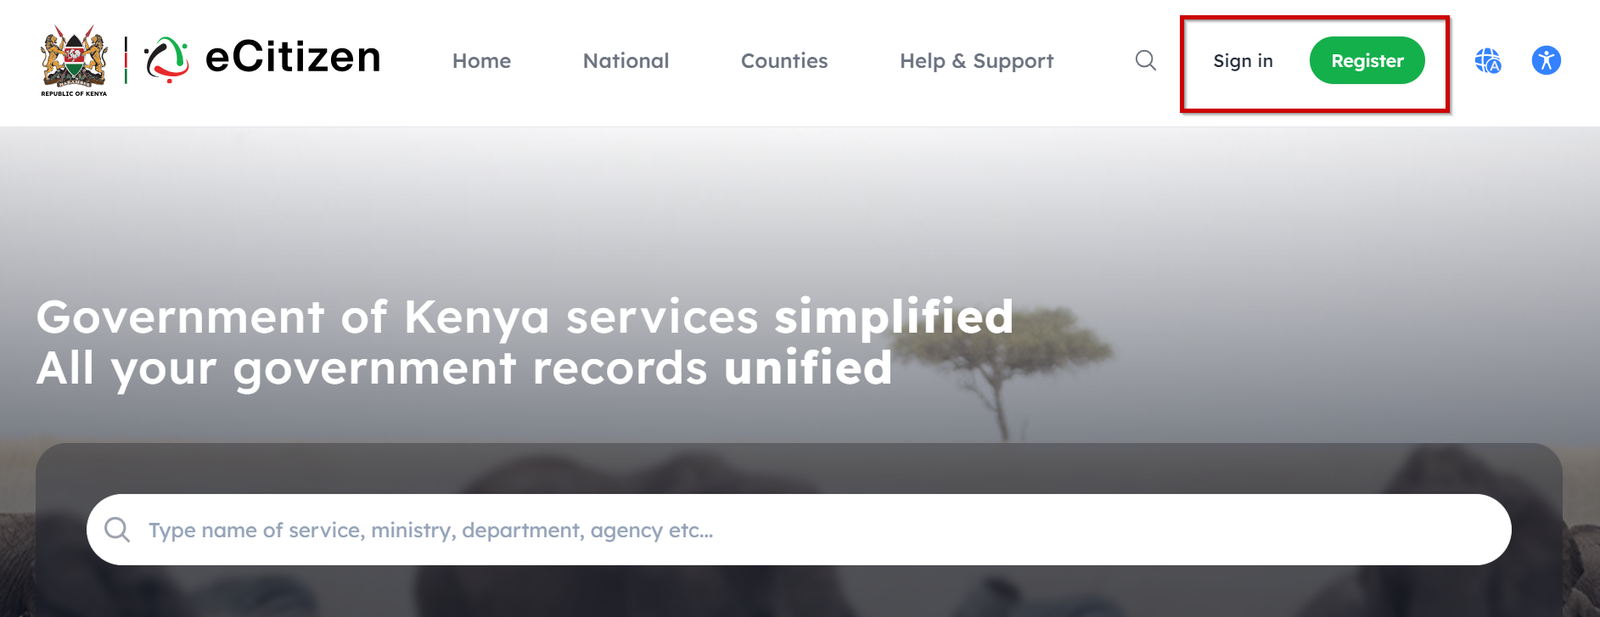
Step 1: Login to your eCitizen Account
If you don’t have an eCitizen account, you’ll need to start by registering for one. Here’s a step-by-step guide on how to go about that.
If you already have an eCitizen account you don’t need to register for another one. In that case, you simply
need to log in to accounts.ecitizen.go.ke
Step 2: Verify OTP
As a safety measure, the eCitizen account requires one to verify their identity through a One Time Password (OTP) which can be sent either through phone number or email.
Be sure to complete this step before proceeding.
Step 3: Scroll Down to the BRS Tab on eCitizen Dashboard
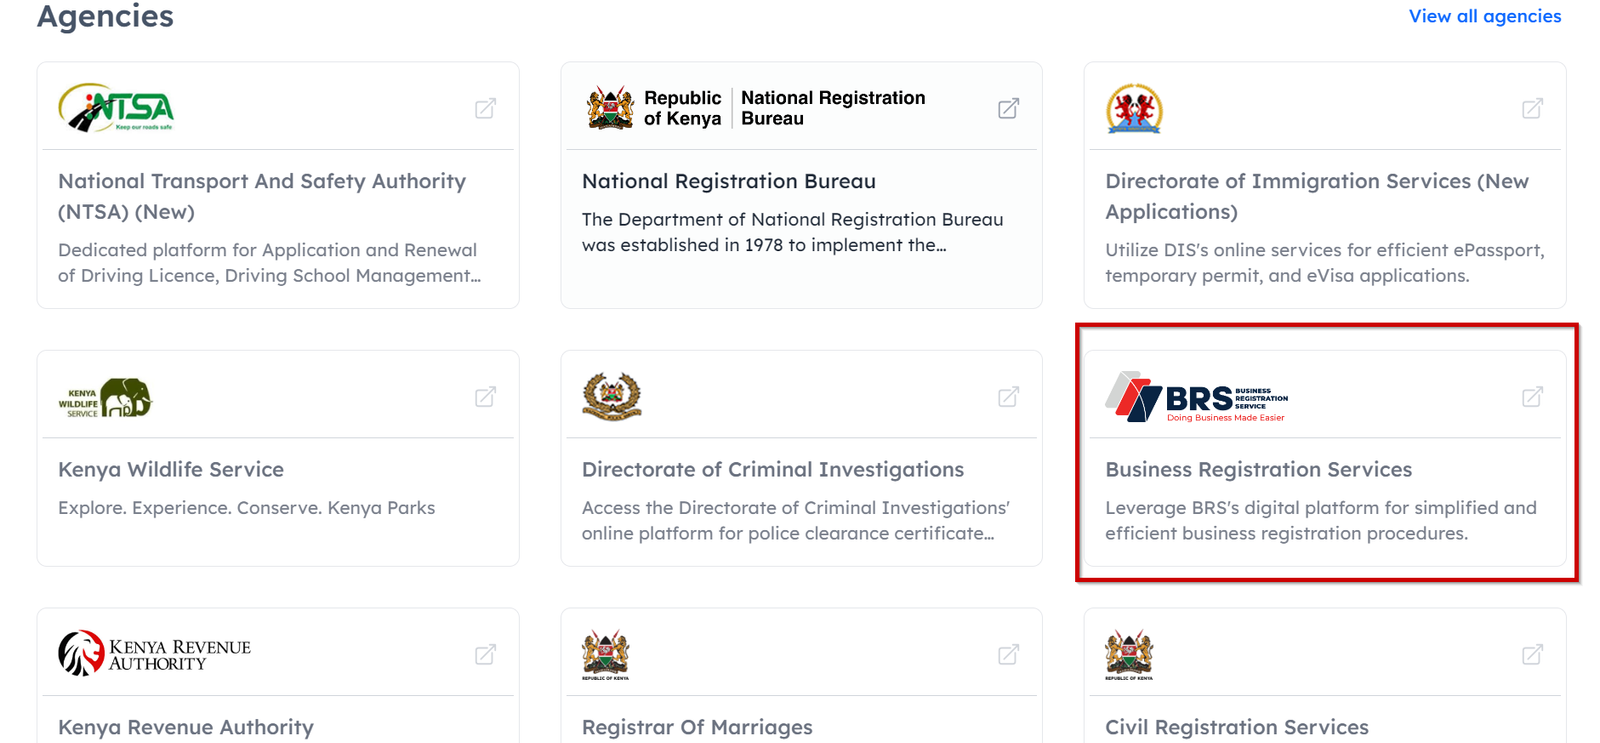
On your eCitizen dashboard, scroll down to the “Agencies” section. Look for the Business Registration Services tab and click on it. Switch to the right user account accordingly. You will be redirected to the BRS dashboard on eCitizen from where you can commence your business name registration process.
NB: At the time of publishing this article, the BRS had started migrating its services to BRS V2.
Step 4: Access BRS V2
The BRS V2 is an advanced version of the original BRS system. It allows users to register their businesses with ease and access more services than before.
To access the BRS V2 Portal you will need to click on the section marked “Here” on the notification bar that appears on the header section of your dashboard.

You may need to sign in afresh to the BRS V2 portal if the system doesn’t automatically redirect you to the dashboard.
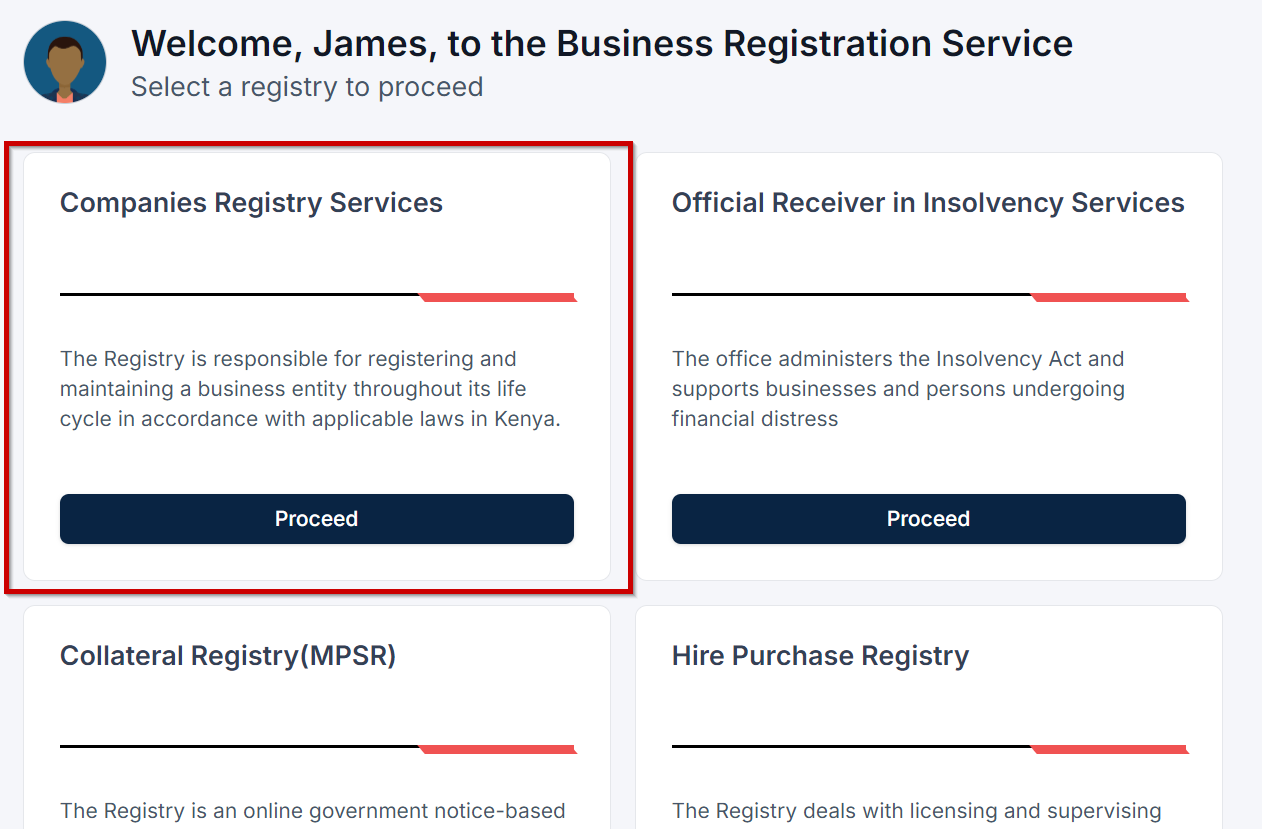
Step 5: Go to Company Registry Services
Upon accessing the BRS V2 dashboard you will need to go to the ‘Company Registry Services’ window. This is where all the company registration services including business name registration are found.
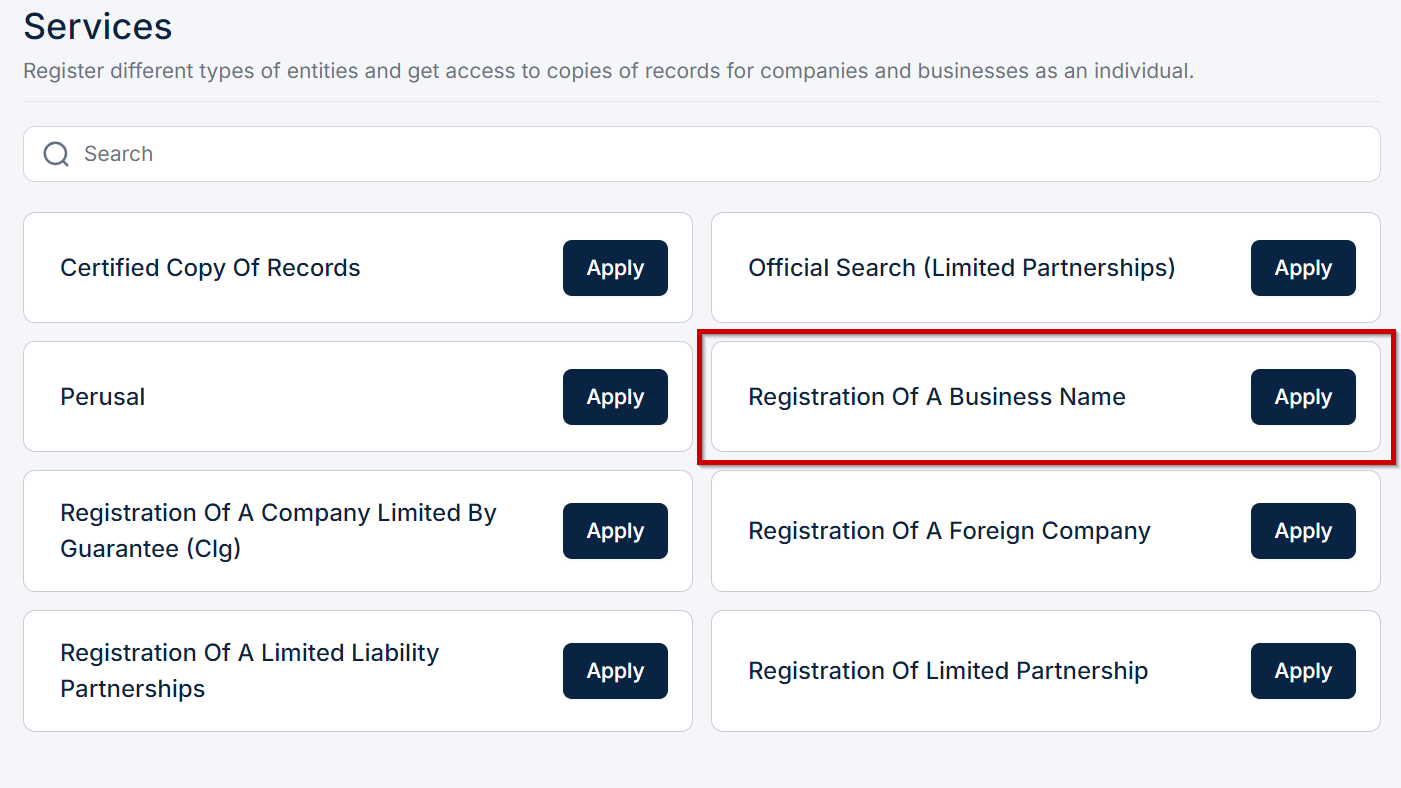
Step 6: Go to ‘Registration of a Business Name’
This is a no-brainer…under the list of services appearing under the “Make Application” tab, go to the option that reads “Registration of a Business Name” and click ‘Apply’.
Step 7: Fill in the Proposed Names
Under this part, you have to write three proposed names for your business. Next to each name, select whether the proposed name is affiliated to any company you have ever registered before. For most people selecting “NO” will suffice.
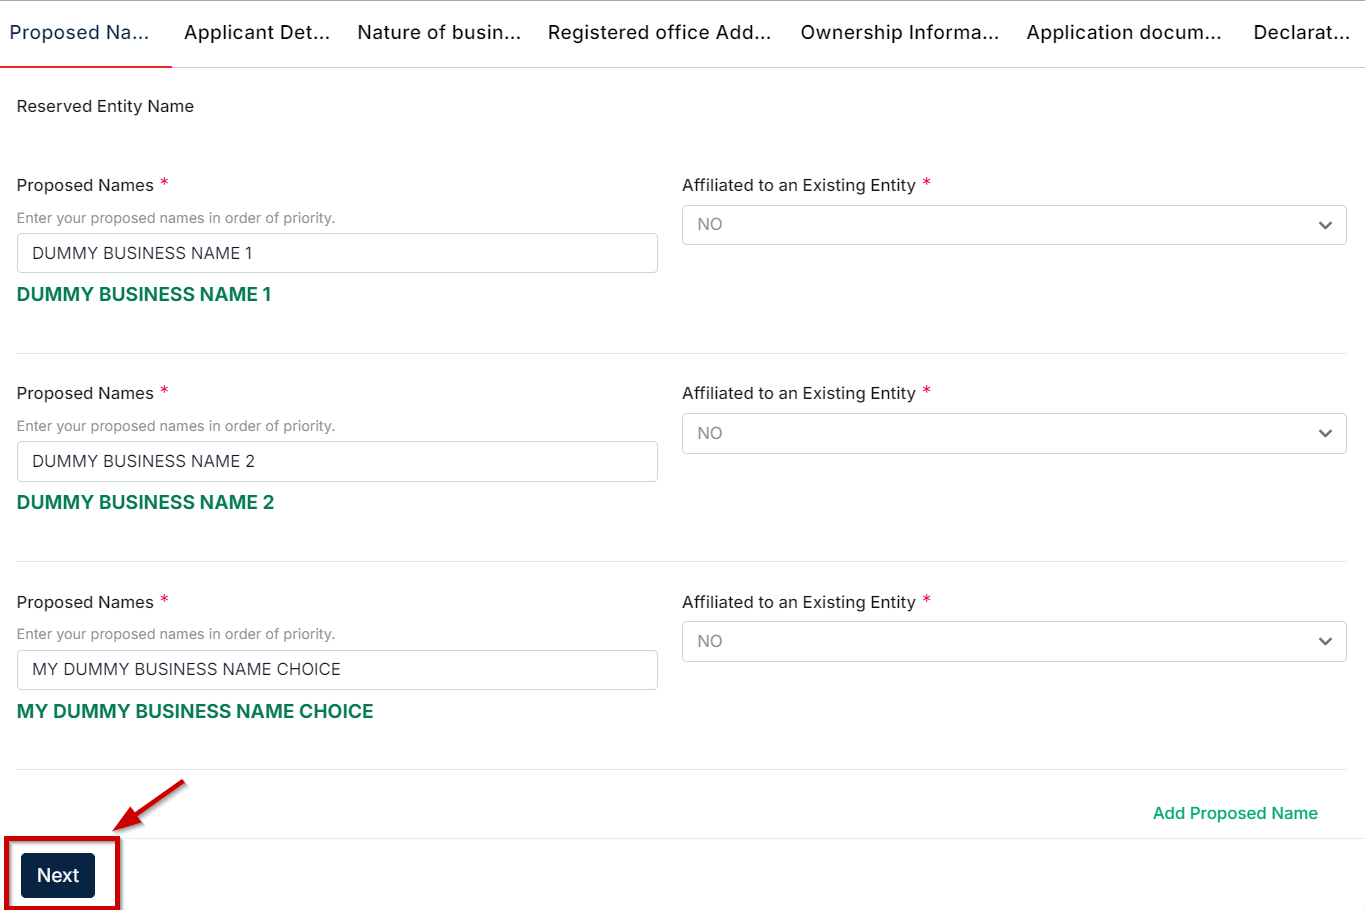
If you select “YES” you will be required to provide details of the affiliate company along with a letter of no objection. A letter of no objection can be obtained from the Central Bank of Kenya (CBK) or in rare cases a letter from the company’s directors.
Once done click next to proceed.
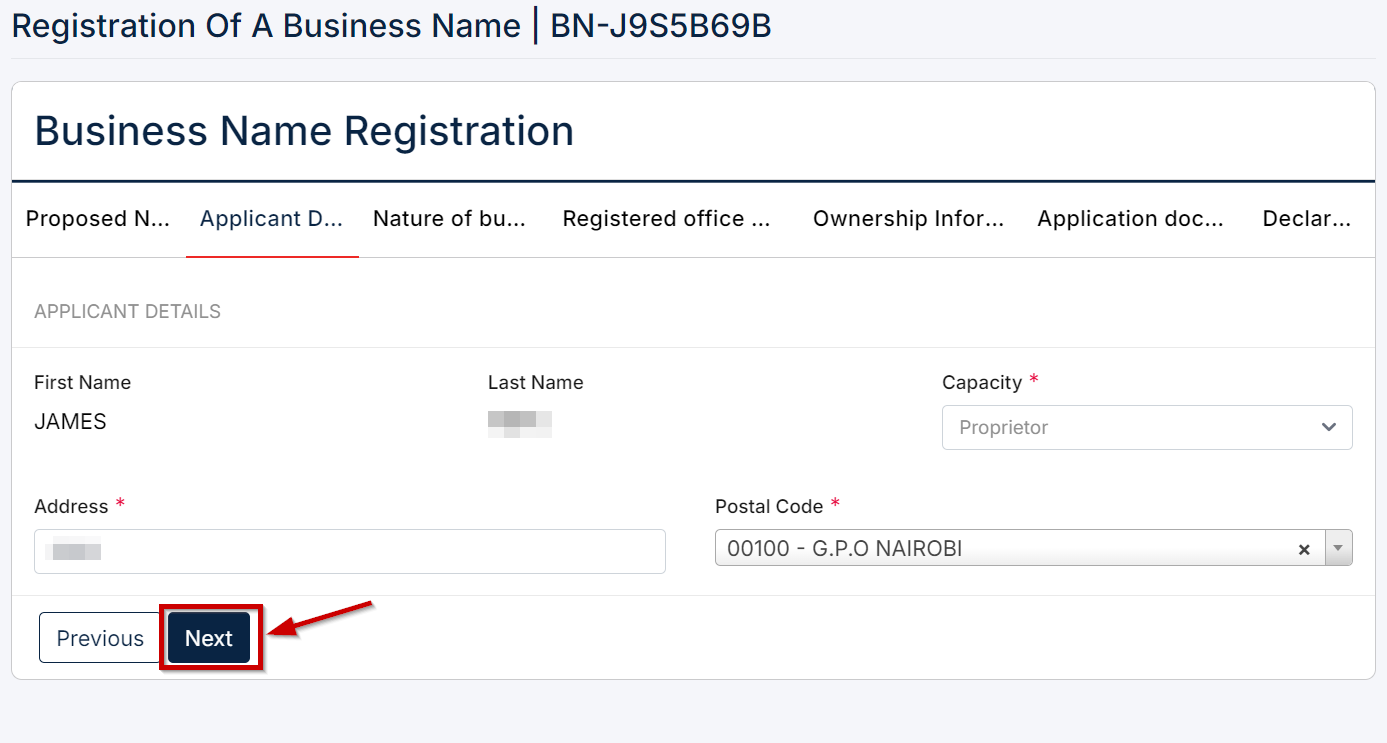
Step 8: Fill in your Details and Capacity
Here you get to fill in the postal code, address, and the capacity or position you hold in the business. If you are registering a small entity that you intend to run on your own, simply select “Proprietor” under the capacity field. Kindly ensure that the details are correctly filled before proceeding.
Step 9: Fill in the Nature of the Business
The BRS system will provide you with a list of categories to choose from. If your business does not fall in any of the categories provided, simply select ‘OTHER.’
This will automatically provide you with a window on which you can explain what your business is all about. For the best experience, please be as descriptive as possible and use examples if necessary.
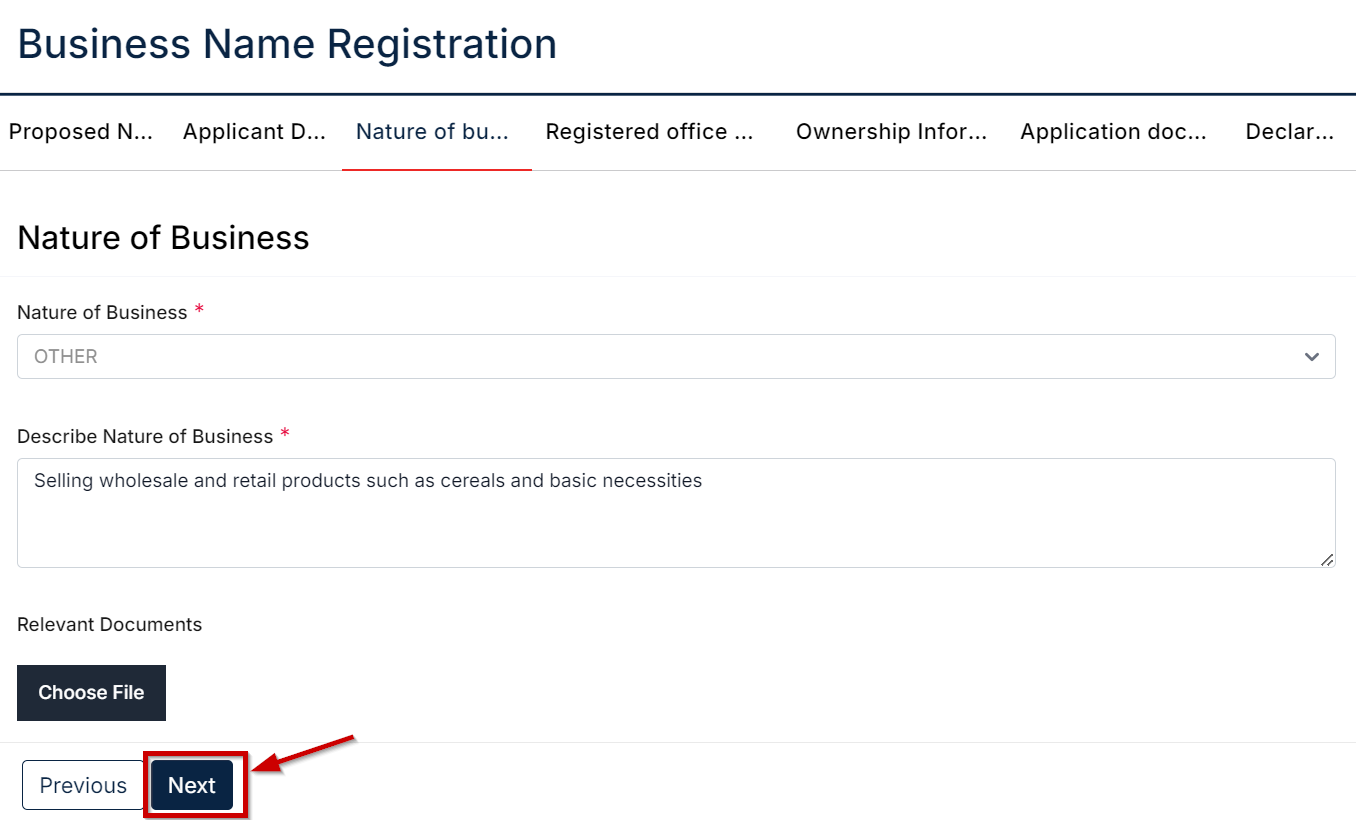
PS: For some business categories you’ll need to provide the relevant documents from the regulating body charged with that industry.
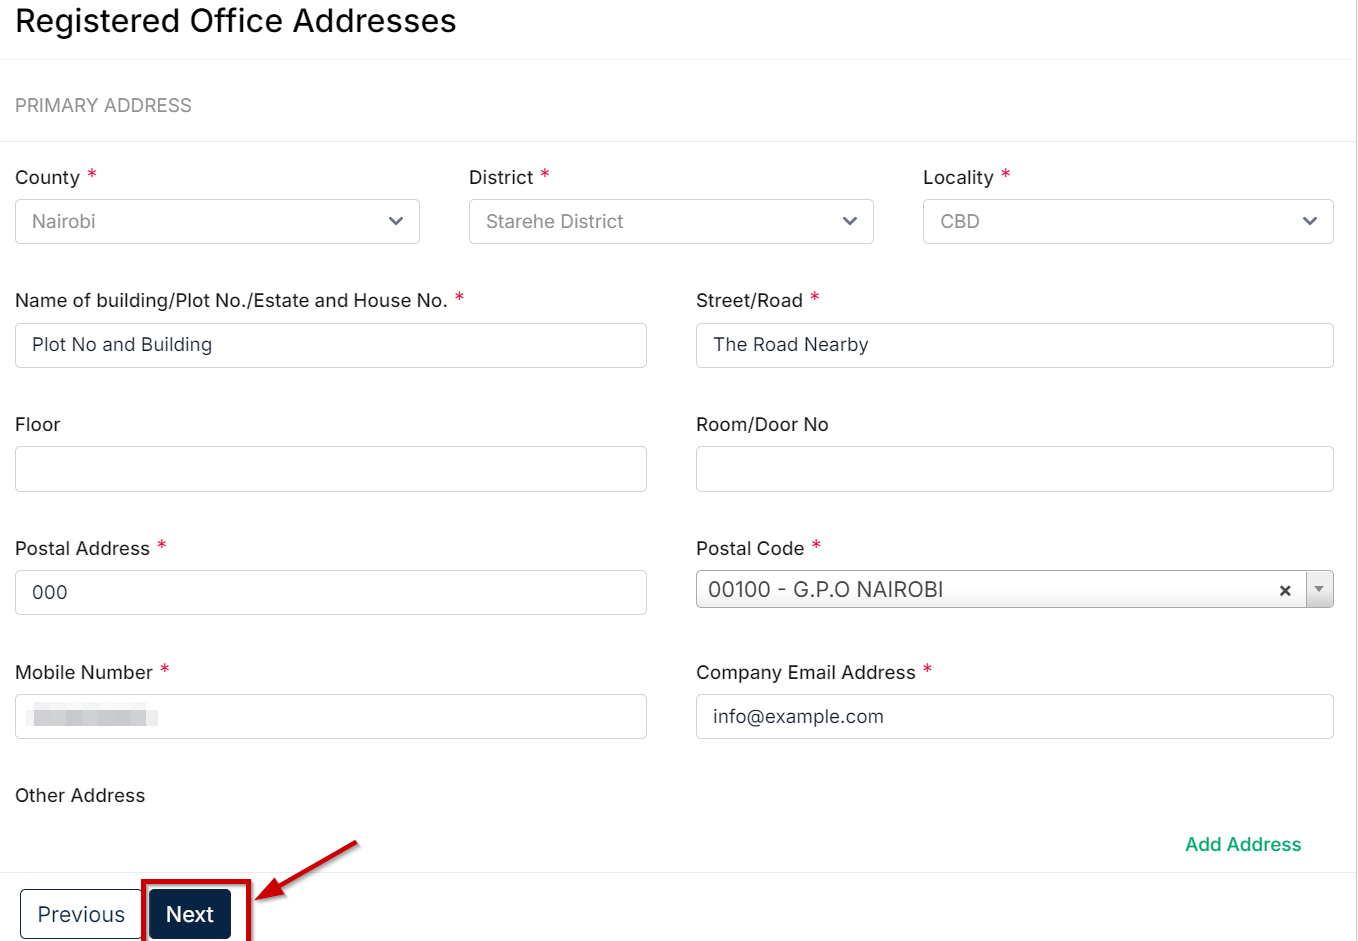
Step 10: Fill the Registered Office Addresses
You fill in your company details, where it is located, the address, and postal code. As for the offices the county where they are located, the road, street, room number, and building have to be filled respectively.
Step 11: Fill in the Ownership Information
The information is all about the owner’s details such as the ID, the name, passport photo, and address. Make sure to fill everything correctly before proceeding. Part of this information might be automatically filled for you using the details available in your eCitizen account.
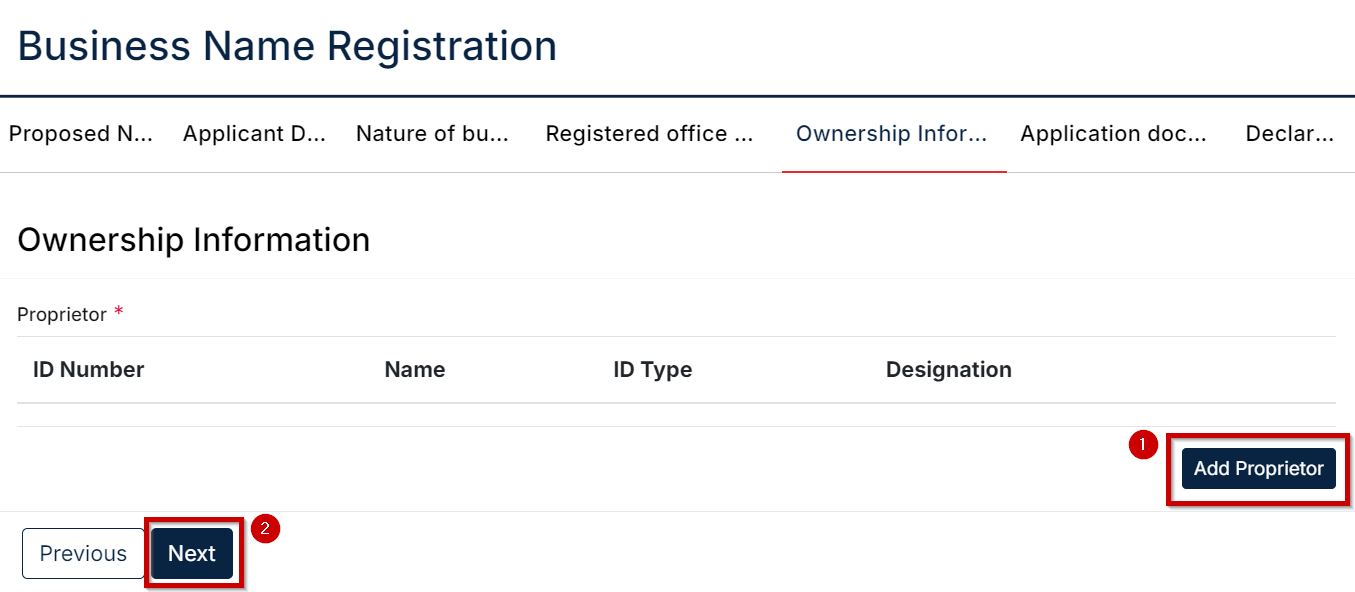
Step 12: Application of Documents
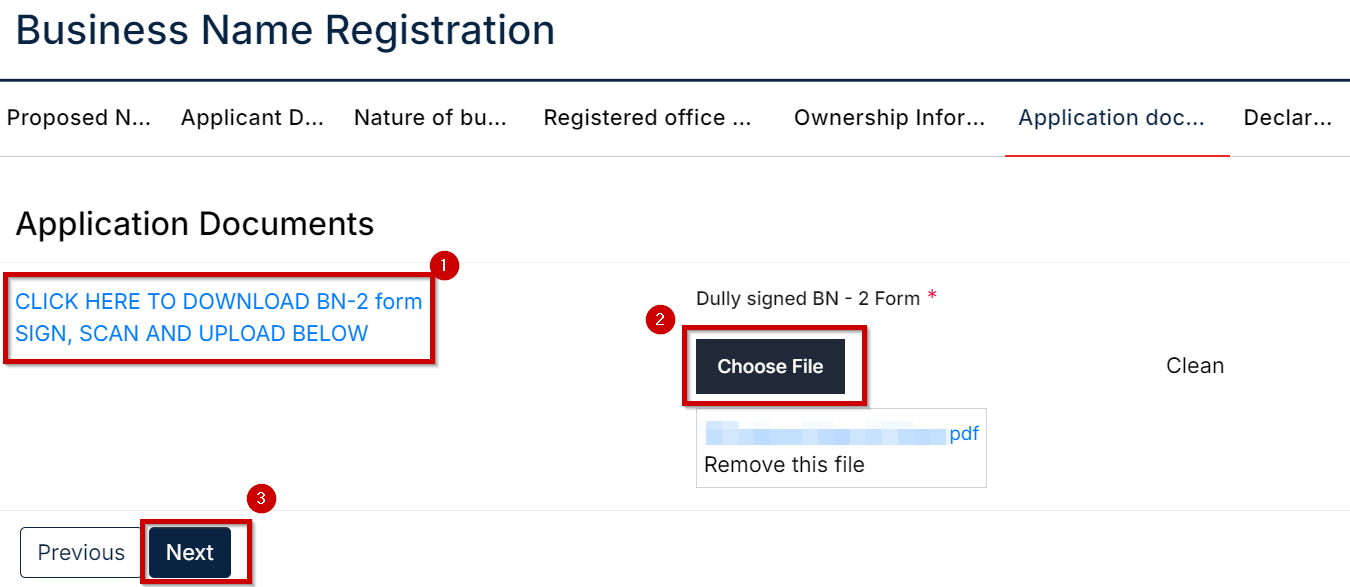
Once done adding the details of the business’ proprietors, click ‘Next” to proceed to the next task which is downloading and signing the BN2 form.
To do this, simply click on the blue text that reads “CLICK HERE TO DOWNLOAD BN-2 form SIGN, SCAN AND UPLOAD BELOW”.
Fill it, sign it and then resubmit it via the relevant button.
Step 13: Declaration
Here you approve that all the information you have provided is true and correctly filled to ensure that there are no mistakes. Once you are sure that everything is true and correctly filled you confirm that the information you have provided is as required by the registrar regarding the application.

Step 14: Payment
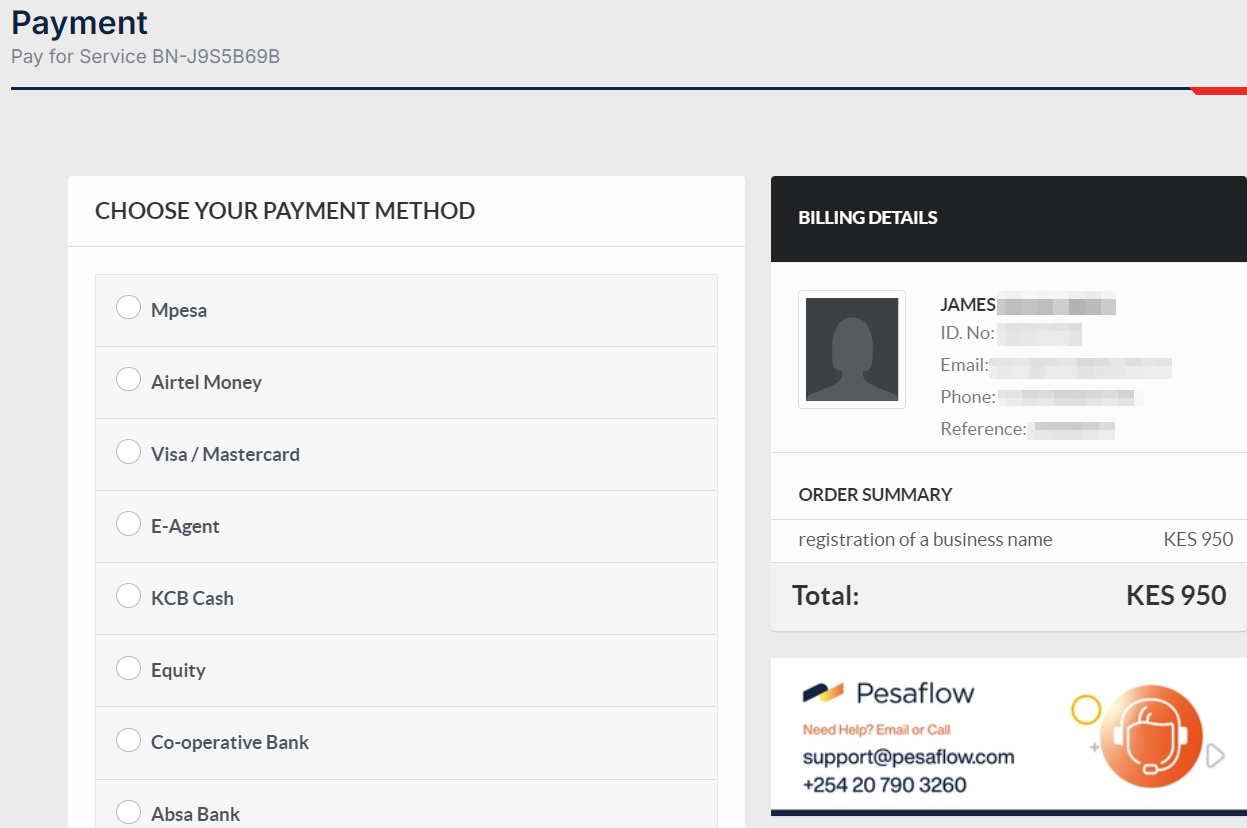
This is the last step in the journey of registering a business name in Kenya. A registration fee of Ksh950 is to be paid to the BRS through any of the payment methods provided namely Mpesa, Airtel Money, Bank payments, Jambo pay etc.
What Next?
The staff at the government registry will go through your submitted documents and they will accept it if the details are correct. If they are not correct, they will request you to amend the details accordingly. Once your application is approved, you are issued with a certificate of a Business Name Registration typically within days.
You will receive an email confirming the approval and it is at this point that you will be able to retrieve your business name registration certificate.
How to Retrieve Your Business Name Registration Certificate from BRS eCitizen
Once you receive an email or text confirming that your business name registration exercise has been approved, the next course of action is to retrieve your registration certificate. Of course, this name is the identity card for your business and you will need it to formally transact using that name – including opening a bank account.
So, how do you retrieve the business name registration certificate? Here are the steps:
Step 1: Login to your eCitizen Account
Step 2: Scroll down to the Business Registration Section (BRS)
Step 3: On the “Account Switcher” choose the account you originally used to make the application & select continue
Step 4: On the notification bar that appears on the top side of the dashboard click on the anchor text marked with the words “HERE”. That anchor text automatically links to https://brsv2.ecitizen.go.ke/ which is the new BRS portal.
Step 5: Upon logging in to BRSV2, go to the dashboard section where you will find the ‘Companies Registry Services’ section, click “Proceed.”
Step 6: Go to the “Application History” tab, this is where you will find a list of all the company names you have recently created. Go to the one whose certificate you’d like to retrieve and click “View”.
Step 7: Scroll down to the section called ‘Downloads’ and under it you will find something that reads “Business Name Registration Certificate”. Next to it are two buttons namely “Download” and “Print.”
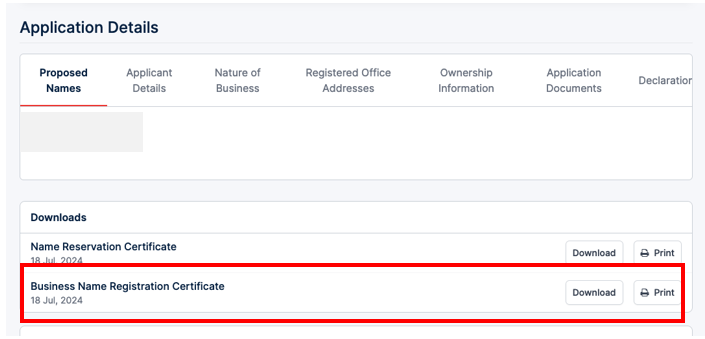
If you select the “Download” option the certificate will be automatically downloaded to the computer you are using while the “Print” option will automatically send it to the printer if you have one connected to your computer
Important NOTE: The certificate can only be accessed through a computer device, not mobile devices
Our Do-It-For-You Business Name Registration Service
This is a real-time cyber service that enables you to get your Business Name registration handled fast and securely.
Note! The service is charged upfront. Follow the following procedure to make the payment.
- Go to your M-PESA menu
- Select Lipa na M-PESA
- Select Pay Bill
- Enter Business no 880100
- Enter Account Number 9534700014
- Enter Amount Ksh 1500
- Enter your 4-digit secret pin
- Confirm by selecting OK
- IMPORTANT: Fill in the required details in the form below
Conclusion
In short, registering for a business name is quite a simple and straightforward process. As we have seen above, anyone can do it at the comfort of their home. So, what are you waiting for? Go ahead; register that business name today and be ready to take the markets by storm. All the best.

Magdalene is a young Kenyan web content author with a deep love for innovation and finding solutions designed to make the world a better place. The BA Marketing & Comms major at Kisii University boasts strong writing skills thanks to her prior training under the Ajira Digital Program by the Government of Kenya.
Thanks for the info.