Have you ever wondered how to obtain a business permit in Nairobi? It’s important to understand the necessary steps and key requirements to successfully navigate this process. This brief article will guide you through the steps to help you acquire a permit for your business. Keep in mind that obtaining a business permit is crucial, as it ensures your business complies with the regulations specific to your industry.
How Much Does It Cost for a Trading License in Nairobi County?
Well, the actual cost of a single business permit in Kenya’s capital varies based on numerous factors such as nature of business, size of business, location etc. Just to give you a rough idea, in one application done in August 2024, a small media and content creation office that has a 5 square meters office in Kibra (Nairobi) and 2 employees was required to pay as follows (annually):
- Trading License – Ksh50,000
- Fire Certificate – Ksh6,000
- Pest Control Certificate – Ksh1,500
- Total – Ksh57,500 (per year)
In another application (also done in August 2024), a small second-hand clothing store located in the Nairobi CBD with 1 employee and occupying 2 square meters was required to pay as follows (annually):
- Trading License – Ksh5,000
- Fire Certificate – Ksh2,000
- Pest Control Certificate – Ksh500
- Total – Ksh7,500 (per year)
Applying for (or Renewing) a Business Permit in Nairobi
To execute the following task you’ll require the following:
- Access to a stable internet connection
- Contact details
- Business name (optional, how to apply for one)
- Business identification number (optional)
Step 1: Visit the Nairobi Self-Service Portal
If you don’t have an account in the Nairobi self-service portal you need to start by visiting the website through the nairobiservices.go.ke portal. In that case, you simply click on Create Account. However, if you already have an existing account, you will simply need to Log In and proceed to the next step.
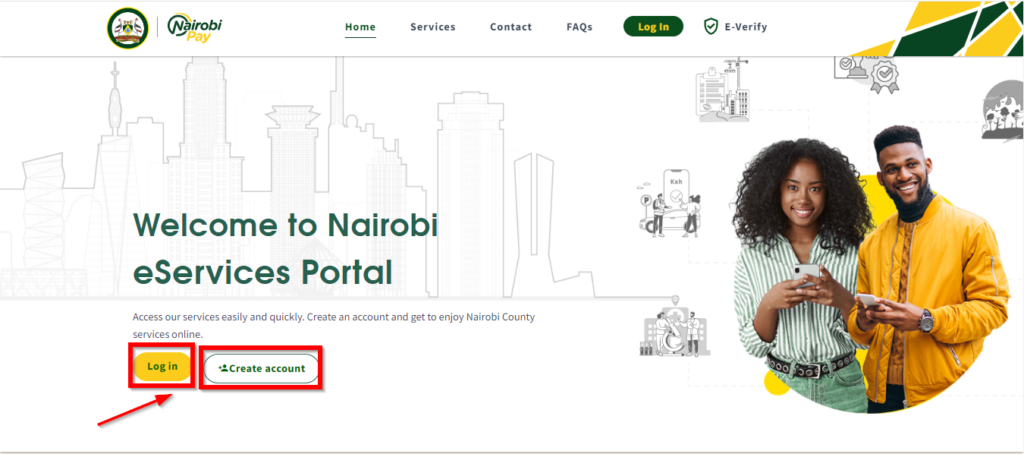
Step 2: Account Creation
If you don’t have an account already, this step will be relevant to you. However, if you are already registered with the county’s online portal, simply Log In to your account and scroll down to Step 7.
Now, for first-time sign ups, upon clicking “Create Account”, a new page will show up whereby you will be required to select which category you fall in, whether individual, organization, or non-citizen.
For most local small business people, selecting “Individual” and “Citizen” will suffice. However, if you are a registered organization or a non-citizen, be sure to select the right tabs accordingly.
The window will appear as follows if you select “Individual” and “Citizen” and you’ll be required to fill in your national ID number.
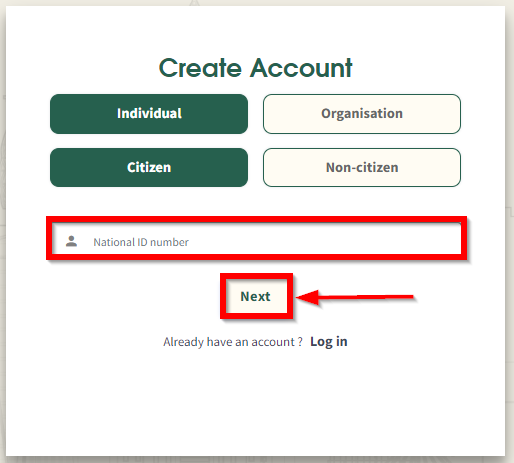
You will then be prompted to fill in your year of birth. Fill it in and then click Next to proceed.
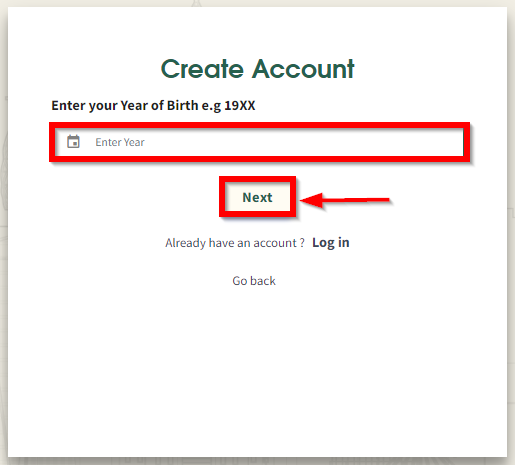
Step 3: Add Phone Number or Email
Click on the blue letters written “Add phone number or email” to receive a One-Time PIN (OTP).
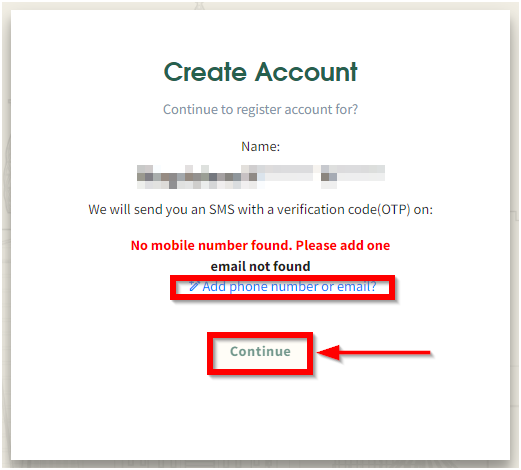
Step 4: Fill in your Contact Details
A window will pop up requiring you to fill in these details namely phone and email address. Fill them in, click “Change Details”.
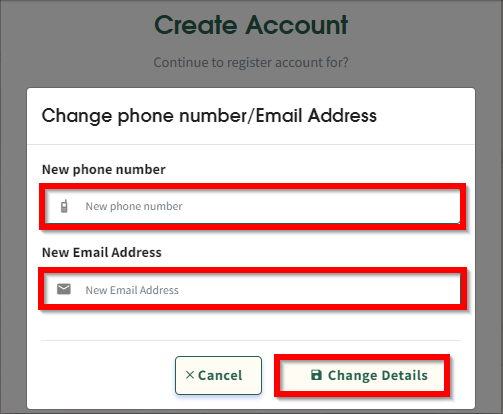
You’ll be ushered back to the first window. Click “Continue” to proceed to the next step.
Step 5: Verification of Your One-Time Pin (OTP)
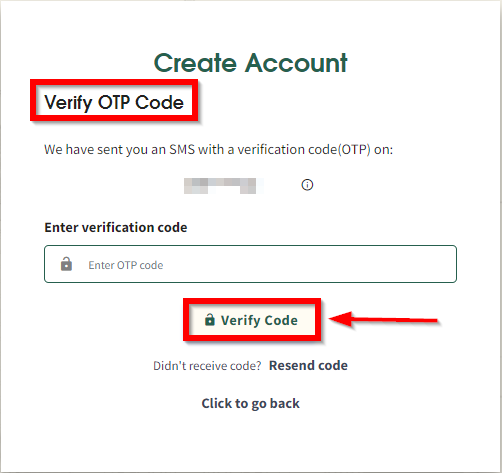
This is a temporary passcode used for security purposes. After receiving it on your phone (or email) you will need to fill it correctly before finally clicking on the tab written ’Verify Code’.
Step 6: Password Creation
A password is a security key to access your account. It should be unique and something you can remember.
Fill it in and thereafter certify that the information you have provided is correct before then clicking on ‘Register’.

You will now receive a message confirming the successful creation of your account. At this point you can now safely Log In using your ID number and the password you just created.
Step 7: Click on the Services tab
Upon logging in to your Nairobi Pay account, proceed to the “Services” tab on the menu. Under “Services” look for Business Licensing – this is where you will find the option to apply for a Unified Business Permit. Click on it to proceed.

Step 8: Business Permit Application
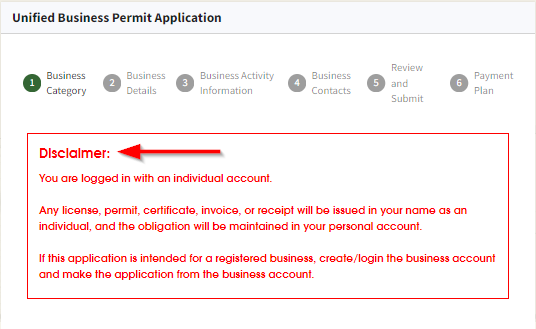
The first thing that appears is a disclaimer explaining the type of account you have depending on the details provided. Be sure to read it carefully.
Step 9:Select the Application details
Here you either choose to apply for a Business Permit or renew it if you had a previous one. In this case, we select ‘Apply’ as it is our first time doing so. Also, there is the filling in of the ‘Nature of the Business’ – this can either be registered or unregistered. If registered you are required to fill in the registration number.

Step 10:Go through the Terms and Conditions
In most cases, there are always conditions that you have to read and understand before going to the next step, and make sure you adhere to them. After going through them carefully click on the green tab written ‘Next’.

Step 11:Fill in the Business Details
You fill in the name of your business, the branch name, the location, the plot number, the road/street number, the building, and the floor number respectively.

After filling them correctly you click on ‘ Next’.
Step 12: Fill in the Business Activity Information
Here you select the industry, business category, subcategory, and business activity. You also have to include any other business activities that your business is involved in.
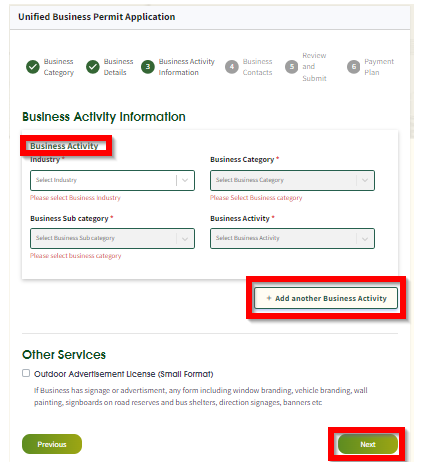
After filling them in there is a part where you get to fill the number of employees and the floor area that your business covers.
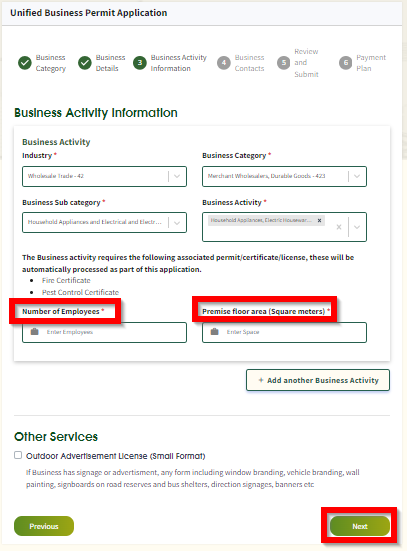
Click ‘Next’ to proceed.
Step 13: Fill in the Business Contact Details
You are required to fill in the email address, phone number, postal code, and postal number of your business. Also, there is the filling in of the phone number, email address, ID number, first name, and the role of business of your contact person.

Click on ‘Next’ once you are sure that the details are correct.
Step 14: Review and Submit
Go through each of the details you have filled and make sure they are correct before submitting.

After you are sure that the details are correct click on “Next”.
Step 15: Proceed to the payment plan
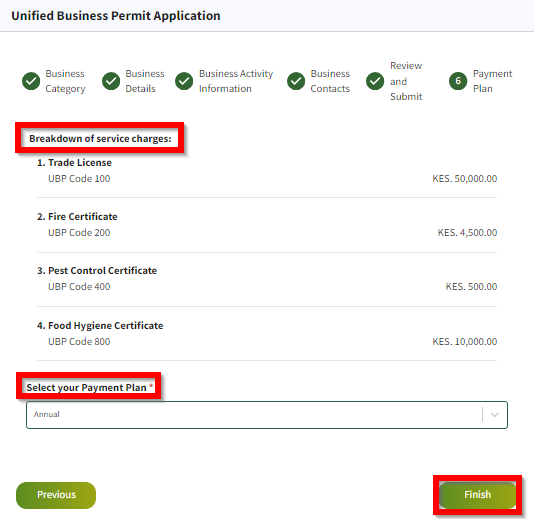
On this page, the service charges are broken down into various categories depending on the type of business you have. There are either certificates or licenses you pay for them according to the amount set up.
There is also the selection of your payment plan it can either be: Annual, Bi-annual, or Quarterly. Once done you may click on the tab written ‘Finish’.
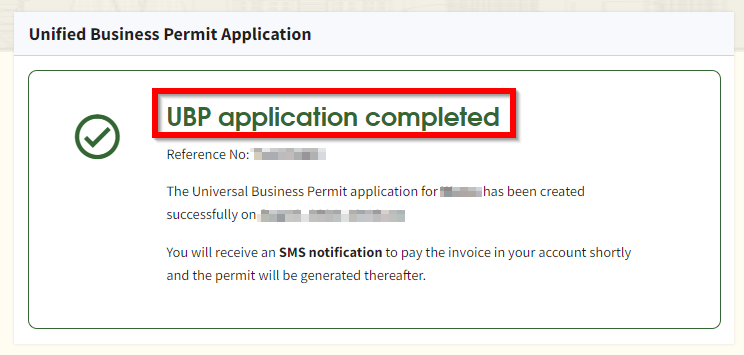
Once you click on finish a confirmation message appears informing you that the business permit has been created and that you will receive an SMS notification to pay the invoice in your account shortly and the permit is to be generated shortly after. A reference number for the same is also sent.
Step 16: Print Your Certificate
Upon making the required payment you will be redirected to a page from where you can download and print your single business permit. Be sure to display it in a visible part of your store as this is a requirement as per the city by-laws.
Who Should Apply for a Business Permit in Nairobi City?
Anyone who does business within the boundaries of the capital city is expected to pay an annual business permit fee to the Nairobi City County government. Nairobi, the capital city of Kenya, comprises multiple sub-counties or “boroughs” including:
| Sub-County | Areas Included | Location |
|---|---|---|
| Embakasi West | Including areas like Kariobangi South, Umoja, Mowlem etc. | Umoja 1, Church Road |
| Langata | Comprising areas like South C, Karen, Nairobi National Park, Highrise etc. | Madaraka, Alpha Court |
| Kibra | Woodley, Sarangombe, Kibera slums etc. | Opp Moi Girls School |
| Embakasi Central | Areas like Komarock, Kayole, and Matopeni among others. | Kayole 1, Spine Rd |
| Makadara | Areas of Makongeni, Mbotela, parts of Industrial Area among others. | Huduma, Makadara |
| Mathare | From Mathari Hospital all the way to Huruma, and Kia Maiko among others. | Kia Maiko Dispensary |
| Westlands | Westlands area, Parklands, Karura Forest, Muthaiga, Kangemi etc. | City Park |
| Roysambu | Roysambu Estate all the way to Kahawa West via Githurai 44. | Garden Estate Primary |
| Embakasi East | Areas around JKIA e.g., Tassia, Soweto, Donholm, all the way to Utawala. | Social Hall, Embakasi |
| Kasarani | Kasarani Estate, Garden City all the way to Kamulu in Ruai. | DC’s Compound |
| Dagoretti South | Dagoretti, Waithaka, parts of Uthiru, parts of Southern Bypass etc. | Social Hall, Waithaka |
| Starehe | City Center (CBD), Kariakor, Ngara, Pangani, and Landi Mawe neighborhoods. | Next to St. Peter Claver’s Racecourse Rd |
| Embakasi South | Pipeline, Mukuru, Parts of Industrial Area, Imara Daima, Kware etc. | A.C.C’s Office, Imara Daima |
| Kamukunji | Eastleigh, Pumwani, California, Moi Airbase etc | Opp Shauri Moyo Police Stn |
| Dagoretti North | Areas like Kawangware, Kilimani, Kileleshwa, Lavington, and Gatina etc. | State Hse Rd (Near AIC) |
| Ruaraka | Mathare North, Baba Dogo, Lucky Summer, Korogocho etc. | Nairobi Water (Korogocho CDF Resource Center) |
| Embakasi North | Areas of Kariobangi North and the greater Dandora neighborhood. | HDD Offices, Dandora Phase 1 |
Conclusion
There you have it! The full guide on how to apply for a single business permit in Nairobi. Remember you can always visit City Hall or your nearest sub-county office for further assistance by the county staff if necessary.

Magdalene is a young Kenyan web content author with a deep love for innovation and finding solutions designed to make the world a better place. The BA Marketing & Comms major at Kisii University boasts strong writing skills thanks to her prior training under the Ajira Digital Program by the Government of Kenya.
